Fools with Tools, Ep. 5: Basic Brake Servicing
The Fool and Tool are back with another episode, this time covering basic brake maintenance. Last time we helped keep you rolling by showing you how to fix your shifting (watch Part 1 and Part 2), now we want to make sure you can stop, too! Tune in to learn the basics, including how to change your brake pads, bedding in new brake pads, brake adjustment, and rotor replacement.
How to Replace Brake Pads:
Tools Used:
- Put your bike in the stand and remove the rear wheel
- Remove the clip securing pad pin/bolt and unscrew the pad pin/bolt.

- Remove the pads and the spring. Most are removed from the top but some need to be removed from below — be aware of this when taking them out.

- Now inspect your old brake pads for wear. Look for wear, abnormal markings, and any other damage.
Note: We recommend replacing brake pads after the halfway point of wear. This is a rough guesstimate, but certain brakes do have actual number measurements. For example, SRAM brake pads measure exactly 4.0mm when brand new, and should be replaced once this measurement drops below 3.0mm.
Another thing to note, when replacing pads make sure the new pads are the same material. Mixing pad materials is not recommended without resurfacing or possibly replacing the brake rotors.
- Next, using a tire lever (or any soft tipped prying device) push the brake pistons back into the caliper. If this is difficult, the brake system may be overfilled with fluid. This is uncommon, but to fix this the bleed port would need to be opened up to allow excess fluid to purge out.
- Clean the pistons with alcohol or brake fluid on a q-tip or rag. Just make sure whatever you're using is clean.

- If the pads are too worn, it's time to replace them. Do this by placing the pad spring in between the pads, being sure that the pads are fully engaged inside the spring.

- Once the pads are reinstalled you can reinstall your brake pad pin/bolt and re-secure the pin/bolt with the retaining clip.

- Using our pad spreader, tire lever, or soft tipped pry tool, make sure the pistons are fully retracted by placing the tool in-between the pads and spreading them apart.
- Reinstall the wheel and begin bedding in the brakes.
How to Adjust Brakes:
Tools Used:
- With bike in stand, identify which brake you will begin adjusting and make your environment quiet, as you will need this to detect where the rubbing is coming from.
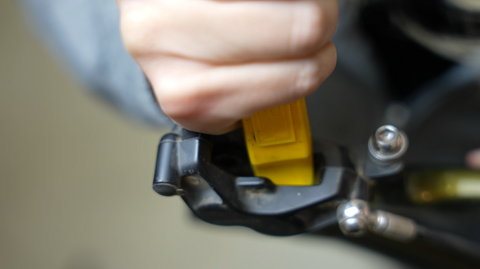
- Then start to loosen the caliper bolts to the align caliper over the rotor.

- While holding the brake lever down, slowly tighten and snug up the caliper bolts after rocking the caliper. Make sure to do this one bolt at a time.

- Release the brake lever and make small inboard/outboard movements to align the caliper.
- Using your fingers or a rotor truing tool, make any fine adjustments to the rotor trueness to fix the rubbing.
Note: Make sure all bolts are tight and listen for the rub before test riding, double checking that the rub is gone.
How to Bed in Brakes:
* This step needs to be done outside and somewhere with enough flat ground to perform accelerations and decelerations*
- Start by pedaling your bike around 10-15mph.
- Then apply even and firm pressure to both brakes. Be sure to remain seated and do not skid.
*Release brakes at a WALKING SPEED and do NOT come to a complete stop*
- Repeat steps the previous steps around 15-20 times
- Start by pedaling your bike around 15-20mph.
- Then apply even and firm pressure to both brakes. Be sure to remain seated and do not skid.
*Release brakes at a WALKING SPEED then come to a complete stop* - Repeat steps 4 & 5 about 5-10 times
- Then let your brakes cool and allow the material transfer to set in.
How to Replace Rotors:
Tools Used:
* This was not shown in the video but we are including instructions here*
- Start by removing your wheel.
- You will now need to identify if your hubs are centerlock or 6-bolt mount, and ensure the new rotors are of the same size and mounting pattern as your old ones.
- Remove the rotor using a centerlock tool or T25 torx bit.

- Using digital calipers, take a measurement of braking surface of rotor to see if replacement is necessary. Generally 1.5mm is the wear limit for most rotors that began at 1.8mm, 0.3mm is the standard wear life.
- If you are past this, install your new rotor. We recommend 5mm of torque.
- Reinstall the wheel and adjust your brake if necessary.